Knee Joint Pain Relief | 5 Minute Stretches to Relieve Pain Now
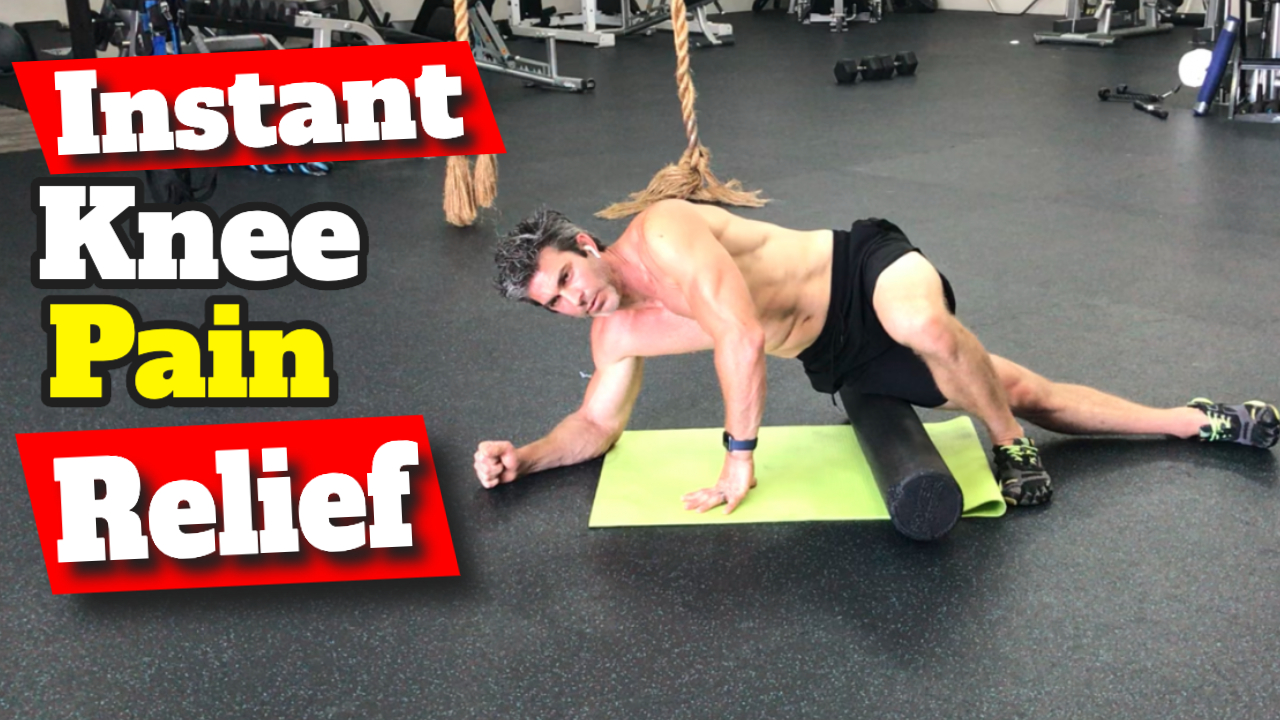
Today, I’m gonna be showing you knee joint pain relief. So, my name is Brent Kasmer. I’ve been doing this for a long time, Brent Kasmer fitness, and I am here to help you. So we’re gonna be going over different types of things. We’ll be using the foam roller today. So you know, I am definitely doing this and seeing this. I mean, a lot of people come in with knee pain.
And it’s always about treating it because if you let something prolong, it can turn into something more serious. You know, you can’t just avoid it or wish it goes away. You actually have to take action and do something about it. So these are all different types of treatments that we teach here at BK fitness and I want to make sure that I help you guys out so if you don’t know what to do, you know definitely personal message me or direct message me and let me know how I can help you, I love to help you out. So, you know, I love helping people, I am someone very passionate about and I love helping people.
CLICK HERE TO DOWNLOAD BRENT’S FREE TRAINING CLASS
Knee Joint Pain Relief
So we’re gonna start off foam rolling. All right, so if you don’t know what a foam roller is, there’s tons of different foam rollers out there. All different densities, sizes, you know, so there’s like ones that are, you know, half this size or a third of the size. There’s ones that have like ridges on them or spikes on them. There’s ones that are like PVC pipes. So you want it to be dense. You want it to be so hard on if you can see this or not, but I’m pushing on it, and there’s really no good in it because the more it can work your muscles out the better is going to be for whatever you’re trying to treat. But it is a pain tolerance thing. So you definitely are going to feel discomfort when you’re doing this because it’s helping to heal you. So you’re creating blood flow, creating circulation, your body’s natural remedies is to heal itself. But if you don’t create the blood flow and let the water and the blood in the air circulate through your body, it can’t treat its own self.
So we’re going to start off on the floor. And you’re going to go on your knees in front of the pad. All right, you never want to roll over top of your kneecap. So we’re going to be working above it, we’re gonna be working on the TFL, the Mo, and then also the TfL as well. So we got the IT band, TFL, VMO, and the quadriceps and then also, we’re going to try to hit all these really quick so that way you can don’t lose me, your setup on both knees, laying on the patio and going your elbows like almost in a plank position. And we’re going to start off just nice and easy, just kind of warming, warming it up. So just going into it just going back and forth. Maybe three times just loosening your quads up before we get into actually rolling them out. So there’s three I’m going to slide this off to the side. So I’m just going to have my left thigh on this pad. Now we’re going to start all the way up near the hip. So at the top part of your quad, we’re going to lay on it. And we’re going to work in three to four inch surface areas. So you’re gonna roll up about three inches. And then roll back, nice and slow, rolling up and rolling back. And this last time, we’re going to stick and hold it so you’re gonna roll up, hold it and curl that left heel. And because my left leg is on the foam roller towards your butt, so curling that left heel up towards your butt.
We’re gonna do this nice and slow about three seconds or three seconds down, three times. And then that is the new starting point. So the new starting point is where you just stop. So you’re going to also do three inches. So back and forth three to four inches. And then stop. And now this is going to be our new starting point. But we’re going to also do those three pulses, curling your foot, three seconds, four seconds all the way towards your butt, and relaxing and all the way back out. More.
And that’s our new starting point. And we’re gonna roll, same thing three, four inches, back and forth. And then stick it, that’s our new starting point. Curling it towards my butt, you guys get the point here. We’ll do this one more time just to finish out this leg. Same thing only got about two to three inches left. So right there like I said, I’m not rolling over top of my kneecap sticking and holding the last one. So this one. Same thing three pulses heels towards your butt. And that is how you would do the one thigh and then he would just do the other one. I’m not gonna make you suffer and go through that with me if you want to, just pause it and the other side.
The next one I’m going to do is IT band. Typically this is where most people have their issues with their knee without knowing that it’s there IT band and this goes right down the side of your thigh. So it comes up to the hip and connects down towards the knee. Same thing, we’re not going to be rolling over top of our knee but you gonna lay start off on your right below your hipbone, kind of the top of your thigh.
So right now I’m working my right side. So my right, top of my thighs on at the side, and I’m going to hook my left foot over top. So the reason you do this too is to help relieve release some of the pressure, so you be driving your body weights worth of pressure into the foam roller, which can be painful. So this helps you to help pick your body up if you don’t want that much pressure on. Or you can go hardcore and just put both feet on top of each other, but not me. So you’re gonna kind of take small steps with your elbow. And this is nice and slow. Don’t go fast. If you find a point that really hurts and you get to that point, you’re like, Oh, my God it’s killing me. Then stop there. And just take some deep breaths. Try to relax as much as possible. And then continue on. So the goal is obviously getting all the way down towards your knee, and you’ll find parts that really hurt and wiggle your toes, the leg that’s on the foam roller, because that helps you to relax because your first inkling when you’re doing this is Oh crap, hurts really bad and he is tense up. So once you find those spots, you’re just gonna stop, take three deep breaths, and then continue to use this top hand to help add pressure to help you move that elbow out further from your body to help you kind of walk it out. You’re using this leg to also help push you forward the top leg. Usually most people find discomfort at the top or the middle, or right above their kneecap or right above the side of their knee joint. Knee joint relief, you’ll find it and you’re just like, Oh, this thing’s really bad. You just lay there and breathe. Sure, right, whatever.
And you’ll go back up your leg also. So hit down toward my knee, and I roll all the way back the other way. So same techniques using the top arm to help brace yourself, move your elbow, put it back on the ground, using this top leg to take pressure off of that, and relaxing the leg that’s on it. So you would go up and down about three times and you’ll flip over and do the other side. Now, you know you want to treat both legs equally. So that way you can kind of get a good grasp of what’s bothering you and what’s working, you know, because the IT band might not hurt on your one leg but it really hurts on the other but your quad my hurt early bad on the other leg and on the other. So you just got to kind of find what imbalances you do have and attack them. Alright, so I’m not gonna bore you anymore. So you got your IT band, you need your quadriceps. So you’ve got those two foam rolled out.
Now I’m gonna do the TFL. So TfL runs laterally, like right on your head. So how do you get to that, right? So you’re gonna lay right on that point, you’re gonna feel that. So it’s above where you started. So before we were below the hipbone, now we’re right above it. And you’re just gonna roll forward all the way toward your stomach. You gotta kind of like wiggle it around, you’ll find where it’s at. So it’s like, I don’t know if you could see the camera. I’ll do both sides. So that way, you can get two different angles and see maybe one angle better. So you roll forward, all the way to the front. And then you’ll roll all the way.
See how my top leg kind of helps me to the back towards your butt. Rolling all the way forward and then all the way back. I’m gonna do the other side, see if it’s any better for you guys to see right ahead, rolling forward trying to relax all the way back. So my arms are up to kind of help me rotate.
All right, we got the TfL, we did the quadriceps, we did the IT band. The next one I do is my calf. So this is kind of a funny movement also. So you want to put the top part of your calf right below your knee on the foam roller. So we’re just gonna do one leg at a time. So I have my right leg on here. It actually even helps if you can do it so that way, it’s at least four to six inches off the ground, about three to four inches off the ground, but you should roll, same thing back and forth a couple inches. And then I want you to do foot circles. It helps release that muscle. You’re gonna do five circles one way and you’ll do five circles the other way. Okay, then you’ll do the same thing three to four inches. And you can tell when you got knots in there. You’ll feel I promise you, you won’t be surprised. Same thing, five circles each way. If you want to add pressure to this, you would take your other foot and just set it right on top of your shin. Okay, so sit down on your shin will add pressure down onto that calf. That’s on the foam roller. Five circles each way. Same thing, one more circle and then the other way. Last time for me, this is like telling us where my calf is really tight, more towards my heel. And if you’re active and you know you’re exercising, you’re gonna be you know, you cause micro tears in your muscles. So you’re gonna be banged up, you’re gonna want to do this. Anyway, so if you have any free time and you’re, you know, wanting to take treat yourself, you know, like, these are great techniques to use pre-workout also. Especially if you’re going to be doing legs and just make sure your knees feel good.
So, we did the foam rolling, the quadriceps, the IT band right down the side of your legs, the TfL and also your calf muscles. So these are good foam rolling techniques to help with the tendons in your knees so that way you are free of pain.
So I’m really hoping that this helps you guys out but just like I say, in all my videos, if it’s hurting you, don’t do it and you got another dealer decipher good pain and bad pain when I say hurts, like if it hurts along, whatever you’re working. That’s ok cause it’s breaking up those adhesions. But if it’s actually making your kneecap hurt more, stop, you know, stop what you’re doing.
CLICK HERE TO DOWNLOAD BRENT’S FREE TRAINING CLASS
So, you know, these are all treatments for you to get help. So I’m hoping these things help out. Like I said, my name is Brent Kasmer. It’s Brent Kasmer fitness and if you’re looking to get help, and to find out how to do this for yourself, then definitely direct message me. Let me know how I can help you out. All right, talk to you in the next video.


